As a developer managing MCP tools across projects, I kept running into the same issues: every MCP server exposed dozens of tools I didn’t need, skills were copy-pasted between repos, and onboarding a teammate (or a new machine) meant walking through server installs, client config, and env vars by hand. CAPA changed that with one file and one command.
The Problem
Typical agent setups today suffer from:
- Tool overload: MCP servers ship with many tools; your agent often needs only a few. Every tool’s schema gets sent to the model anyway, wasting context and muddying decisions.
- Skill duplication: Reusing a skill usually means copying it into each project. When you improve the skill, you have to update it everywhere.
- Team setup friction: New joiners (or a new laptop) must install servers, configure the MCP client, set environment variables, and register endpoints, all by hand and easy to get wrong.
- Secrets and env: API keys and config end up hardcoded or scattered across different config files.
The Solution: CAPA
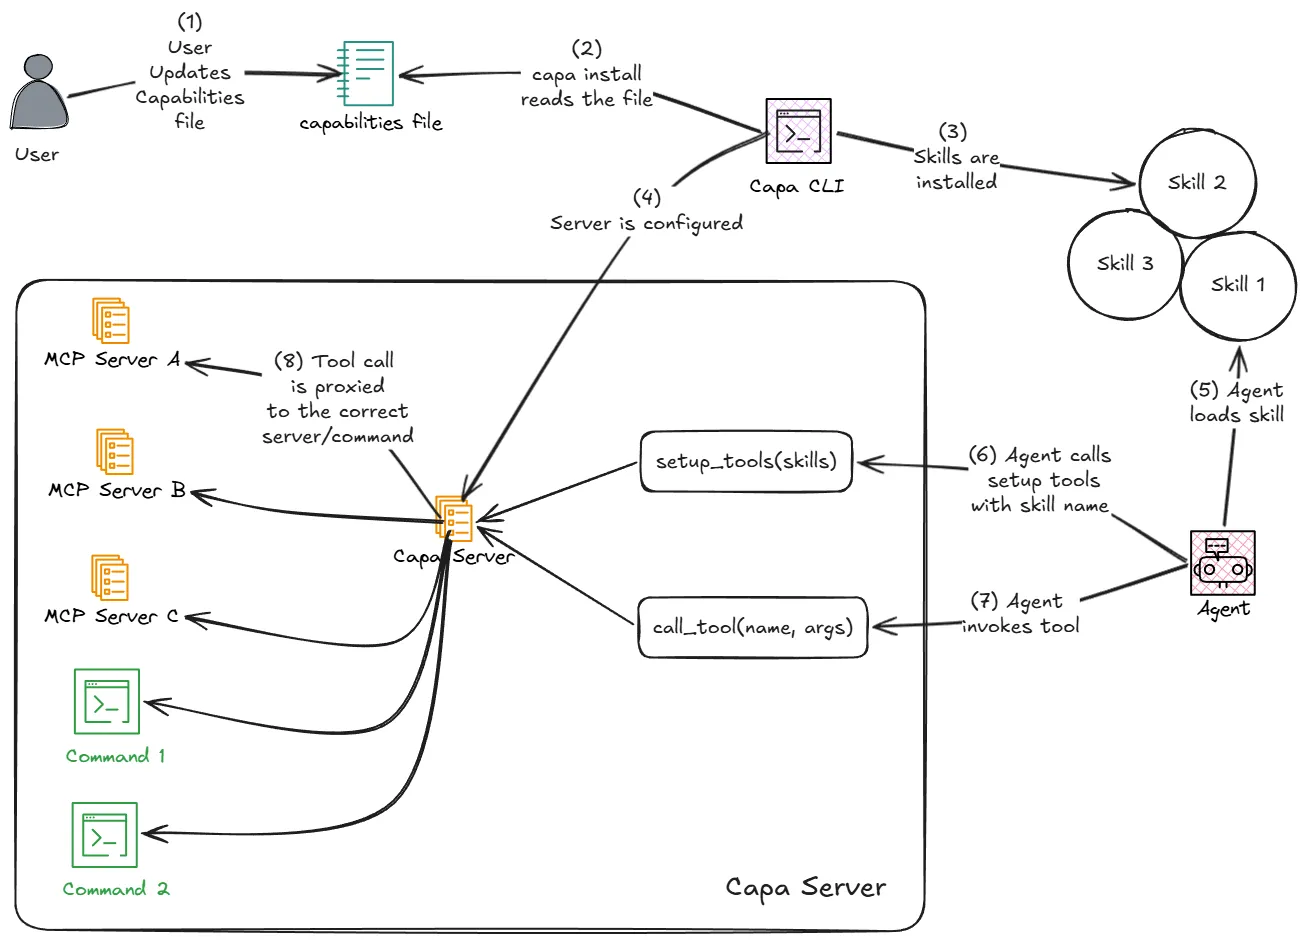
CAPA is a “package” manager for AI agents. You define everything in a single declarative file, capabilities.yaml, and run one command: capa install. CAPA doesn’t implement each tool itself; it sits between your MCP client (e.g. Cursor) and your tool sources, proxying tool calls to downstream MCP servers and to shell commands. One CAPA server, one config, many tools, without reimplementing anything.
In the default “expose-all” mode, CAPA exposes only the tools your skills actually need. In on-demand mode it goes further: the agent initially sees just two meta-tools (setup_tools and call_tool) and loads real tool schemas only when it activates a skill. Either way, context stays under control.
Reducing Context Size
In on-demand mode, tools are omitted from the system prompt until they’re really needed. The flow is:
- Activate a skill: The agent calls
setup_tools({"skills": ["web-researcher"]}). - Get schemas: CAPA returns the full tool schemas (name, description, parameters) for that skill.
- Invoke tools: The agent calls
call_tool({"name": "brave_search", "data": {"query": "..."}}), and CAPA proxies the call to the right MCP server or command.
So the agent’s context starts with just two meta-tools; it only receives the full set of tool definitions after it decides which capability it needs. No need to ship every tool’s schema up front.
setup_tools({"skills": ["web-researcher"]})
// CAPA returns: tool schemas for brave_search, etc.

call_tool({"name": "brave_search", "data": {"query": "latest AI developments"}})
Reusability
Skills don’t have to live in your repo. You can reference them as inline content, from GitHub (owner/repo@skill-name), GitLab, or a remote URL. Put the capabilities file in version control; the team shares one definition. When you run capa install, CAPA fetches remote skills and wires everything. One update to a shared skill benefits every project that references it. No copy-paste.
One Command for Teams: capa install
The only command you need to get everything ready is:
capa installIt:
- Installs skills to your configured agents (e.g.
.cursor/skills/) - Configures the CAPA server with your tools and servers
- Prompts for any required credentials via a web UI, or use
capa install -eto load from a.envfile - Registers the project’s MCP endpoint in your client config (e.g. Cursor)
- Starts the CAPA server
New teammate? They clone the repo, run capa install, enter secrets once or point to .env, and they have the same agent setup as everyone else.
# Interactive: web UI for credentials
capa install

# Non-interactive: use .env (e.g. CI or team .env.example workflow)
capa install -e
capa install -e .prod.env
Proxying Tool Calls
In capabilities.yaml you define servers (e.g. Brave Search, filesystem, GitHub) and tools that reference them. MCP tools use server: "@brave" and tool: brave_web_search; CAPA proxies each call_tool to the correct MCP server. You can also define command tools (shell commands with arguments and an optional init step), which CAPA runs locally and returns the output. So CAPA proxies to both downstream MCP servers and to commands.
Example: one MCP tool and one command tool:
servers:
  - id: brave
    type: mcp
    def:
      cmd: npx -y @modelcontextprotocol/server-brave-search
      env:
        BRAVE_API_KEY: ${BraveApiKey}

tools:
  - id: brave_search
    type: mcp
    def:
      server: "@brave"
      tool: brave_web_search

  - id: greet_user
    type: command
    def:
      run:
        cmd: echo Hello, {name}!
        args:
          - name: name
            type: string
            description: The name to greet
            required: true
Environment Variables and Secrets
CAPA makes it easy to handle secrets and env vars. In the capabilities file you use placeholders like ${BraveApiKey} or ${GitHubToken}. Never hardcode keys. When you run capa install, CAPA opens a web UI to collect those values, or you use capa install -e to load them from a .env file. Values from the web UI are stored encrypted in ~/.capa/capa.db. For teams and CI, keep a .env.example listing required variables and add .env to .gitignore; everyone runs capa install -e with their own .env.
The Result
Before: multiple MCP servers, a huge tool list in context, duplicated skills, manual client config, and scattered secrets. After: one capabilities file, one capa install, and either a small curated tool set or two meta-tools with on-demand loading. Ask the agent to research a topic; it activates the web-researcher skill and uses brave_search without ever seeing fifty other tools.
Why CAPA Made the Difference
- Context: Only the tools you need (or, in on-demand mode, just two meta-tools until the agent activates a skill).
- Reusability: Reference skills from GitHub, GitLab, or a URL; one update benefits all projects.
- Team alignment: Commit
capabilities.yaml; everyone runscapa installand gets the same agent setup. - Proxying: One CAPA server in front of many MCP servers and commands, with no tools reimplemented.
- Secrets: One place for credentials (web UI or
.env); no keys in YAML.
What could have been a mess of per-project MCP config, duplicated skills, and manual onboarding becomes a single declarative file and one command.
Conclusion
If you want less context bloat, reusable skills, and a single-command way to manage agentic setup across your team, CAPA is worth trying. Define your capabilities once, run capa install, and let CAPA proxy the rest.
What came after this post
CAPA kept going, and each of these picks up where this one stops:
- Every MCP tool is a shell command.
capa shruns a configured tool from the terminal, no model involved. - A sub-agent should not hold every tool. Per-role skill and tool lists, written out as native agent files.
- A console, a registry, and plugins. A local web console, skill registries, and remote plugin installs.
- What the agent actually did. Activity traces for the prompt, files, shell, and MCP calls of a run.
- The tool list got too expensive. Search is now the default tool exposure, and exposure is per server.
Ready to try it? Install with the command below or learn more at capa.infragate.ai.
# macOS and Linux
curl -LsSf https://capa.infragate.ai/install.sh | sh
# Windows (PowerShell)
powershell -ExecutionPolicy ByPass -c "irm https://capa.infragate.ai/install.ps1 | iex"